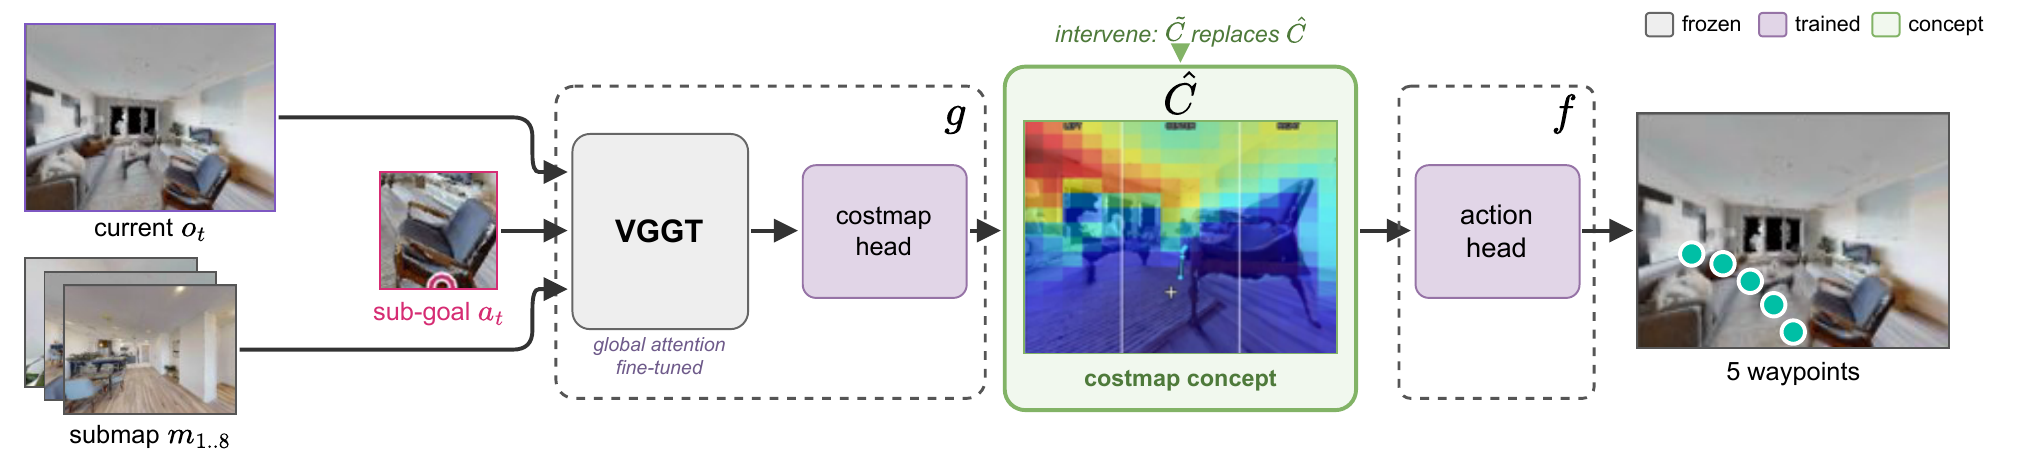
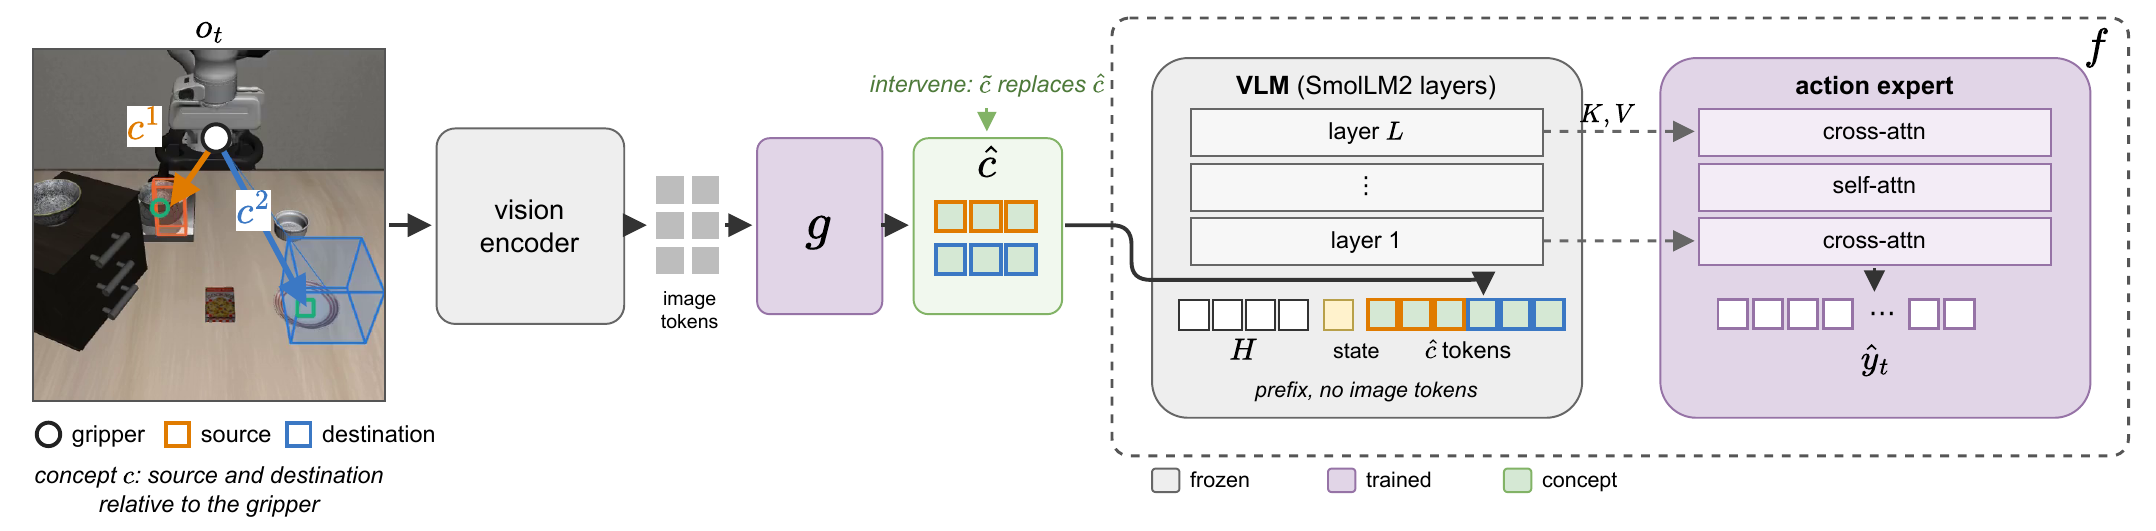
Robot learning models have been proliferating with increasingly stronger results for both generalist and specialist policies. However, true deployment potential of these learned policies is still unknown. As the community closes in on translational research, it is now ever more crucial to develop mechanisms that not only enable interpretability but intervention as well, e.g., through concept bottleneck models. In this work, we present an initial investigation along the lines of an interpretable spatial concept bottleneck that acts as a meaningful intermediate representation between a perception-planning backbone and an action head. Specifically, we define a spatial concept as a geometric relationship between entities corresponding to the task and the robot, which can be computed directly from the scene's geometry, and instantiate it for both navigation and manipulation. We present a series of experiments demonstrating that such a spatial concept bottleneck maintains original performance (without the bottleneck), while serving as an interpretable interface through which humans or VLMs can intervene to correct or steer the robot.
We define a spatial concept as a geometric relationship between entities corresponding to the task and the robot, which can be computed directly from the scene's geometry. The perception backend \(g\) predicts the spatial concept \(\hat{c}\) and the actor/controller head maps the concept and optionally the proprioceptive state \(\rho_t\) to action \(\hat{y}_t = f(\hat{c}_t, \rho_t)\). The robot executes \(\hat{y}_t\), observes \(o_{t+1}\), and the loop repeats.
\[ c^k_t = \psi\big(a^k_t, r\big), \qquad r \in R_t \]The task mandates an exocentric entity \(a^k_t\), such as a navigation sub-goal or a destination point for the gripper, and the robot provides an egocentric entity \(r\).
We define a spatial concept bottleneck for navigation as a visual representation of navigation affordances in the robot's current view. The sub-goal pixel is the only anchor, and the egocentric entity is the 3D point \(X_t(u)\) of each pixel \(u\) of the current observation.
For manipulation, we define two exocentric spatial entities: source and destination, corresponding respectively to the pick and place objects. The source object defines where to act as \(a^1_t\) and the destination defines where to place as \(a^2_t\). We use a single egocentric spatial entity that represents the end effector position \(r_t\), and \(\beta\) discretizes each axis of the difference in positions into 13 bins on a logarithmic scale. The concept therefore consists of six values, the \(x\), \(y\) and \(z\) offsets of the source and of the destination from the gripper. The bins are narrow near the gripper and wide far from it, giving centimetre precision close to the object and a coarse direction elsewhere.
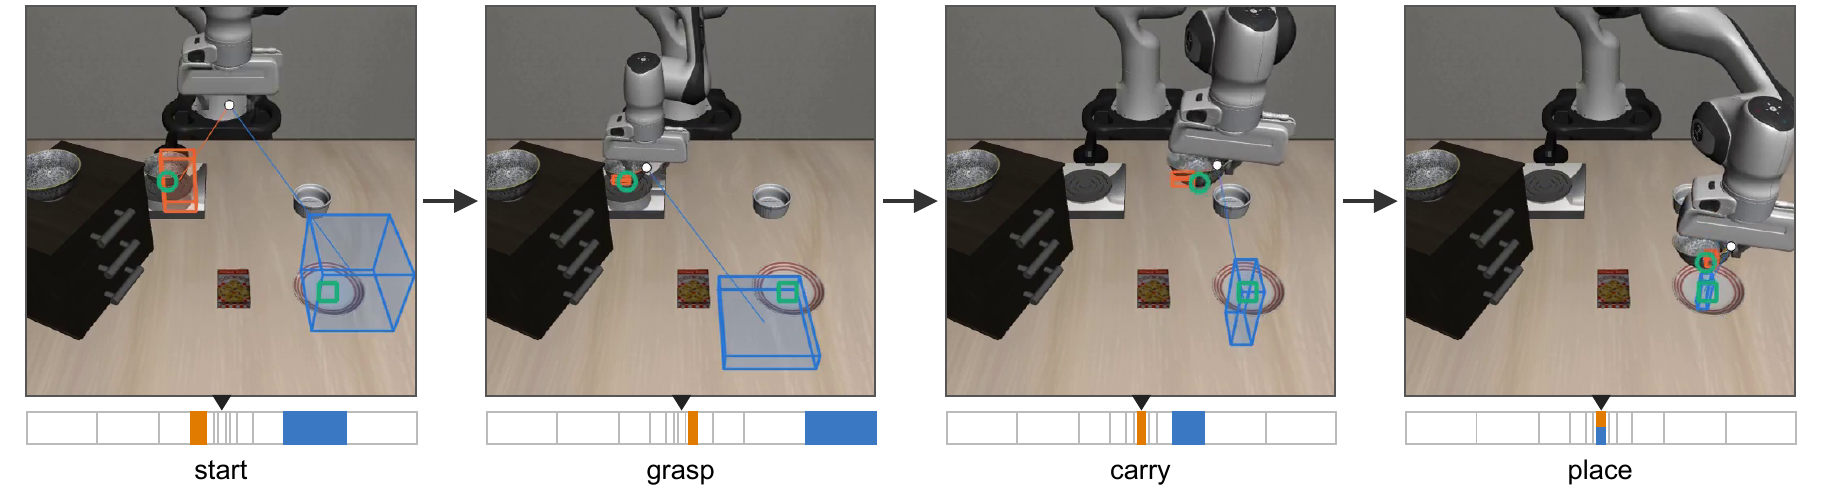
The concept along one rollout (LIBERO-Spatial, true concepts). Each box is the bin \(\beta\) puts the source (orange) or the destination (blue) in, drawn around the gripper. Green represents the object's true position. Below each frame, the 13 bins of one axis to scale, with the source's and the destination's bin. The triangle is the gripper.
Spatial CBM is on par or better than predicting Direct Actions.
| Imitate | Alt Goal | Shortcut | Reverse | Average | ||||||
|---|---|---|---|---|---|---|---|---|---|---|
| Method | SPL | SSPL | SPL | SSPL | SPL | SSPL | SPL | SSPL | SPL | SSPL |
| GT-Geodesics | 96.43±2.34 | 98.78±1.72 | 86.53±4.07 | 91.16±3.20 | 88.42±0.20 | 91.67±1.19 | 82.99±0.32 | 91.97±0.39 | 88.59±1.63 | 93.40±0.83 |
| GT-ED | 72.16±2.00 | 74.58±1.53 | 70.29±4.89 | 78.49±5.94 | 67.76±2.28 | 70.72±3.19 | 68.41±2.51 | 77.53±1.12 | 69.65±1.78 | 75.33±1.35 |
| Direct Action | 82.61±5.77 | 86.92±3.07 | 59.99±13.07 | 67.84±12.07 | 61.15±5.91 | 71.86±4.21 | 18.41±3.28 | 34.47±2.82 | 55.54±0.47 | 65.28±0.49 |
| Spatial CAM | 87.25±0.03 | 89.70±0.46 | 28.18±7.16 | 41.45±9.01 | 38.13±0.27 | 42.01±0.70 | 7.86±2.25 | 15.71±0.78 | 40.36±1.17 | 47.22±2.00 |
| Spatial CBM* | 81.14±5.83 | 86.44±2.54 | 57.81±2.94 | 68.08±3.56 | 66.06±3.92 | 74.20±2.97 | 12.55±0.08 | 27.33±2.27 | 54.39±3.19 | 64.01±1.70 |
| Spatial CBM | 80.80±2.08 | 86.12±1.82 | 68.27±6.43 | 73.89±5.33 | 73.06±2.69 | 80.29±1.80 | 19.38±10.22 | 33.73±9.12 | 60.38±5.36 | 68.51±4.52 |
SPL and SSPL on four navigation tasks, with the best non-oracle scores in bold.
With true concepts the spatial bottleneck performs on par with Direct Action, and swapping the source and destination brings the GT policy down to 4.5%.
| Method | T1 | T2 | T3 | T4 | T5 | T6 | T7 | T8 | T9 | T10 | Average |
|---|---|---|---|---|---|---|---|---|---|---|---|
| GT | 100.0±0.0 | 97.5±3.5 | 100.0±0.0 | 95.0±0.0 | 75.0±7.1 | 25.0±0.0 | 97.5±3.5 | 100.0±0.0 | 87.5±17.7 | 70.0±7.1 | 84.8±2.5 |
| Direct Action | 97.5±3.5 | 100.0±0.0 | 97.5±3.5 | 97.5±3.5 | 70.0±7.1 | 27.5±3.5 | 92.5±10.6 | 95.0±0.0 | 82.5±3.5 | 77.5±10.6 | 83.8±1.8 |
| Spatial CBM* | 95.0±7.1 | 95.0±0.0 | 92.5±10.6 | 90.0±7.1 | 65.0±0.0 | 15.0±0.0 | 95.0±7.1 | 92.5±3.5 | 75.0±7.1 | 57.5±3.5 | 77.2±2.5 |
| Spatial CBM | 90.0±0.0 | 85.0±0.0 | 95.0±0.0 | 90.0±7.1 | 62.5±3.5 | 12.5±3.5 | 95.0±0.0 | 87.5±10.6 | 75.0±7.1 | 57.5±3.5 | 75.0±0.7 |
| Intervention | |||||||||||
| Spatial CBM, intervened | 95.0±0.0 | 87.5±3.5 | 97.5±3.5 | 95.0±0.0 | 67.5±3.5 | 17.5±3.5 | 97.5±3.5 | 95.0±0.0 | 82.5±10.6 | 62.5±3.5 | 79.8±2.5 |
| Ablations | |||||||||||
| No concept | 90.0±7.1 | 80.0±7.1 | 87.5±3.5 | 85.0±0.0 | 62.5±3.5 | 15.0±0.0 | 90.0±7.1 | 72.5±3.5 | 62.5±3.5 | 37.5±3.5 | 68.2±2.5 |
| GT, swapped† | 40.0 | 0.0 | 0.0 | 5.0 | 0.0 | 0.0 | 0.0 | 0.0 | 0.0 | 0.0 | 4.5 |
Success (%) on the ten LIBERO-Spatial tasks over two training seeds (†one seed).
The key benefit of the bottleneck structure of CBMs is that they allow intervention of human-interpretable concepts at test time. They provide insight into the model's intent which it has to use to generate outputs. The intervener is provided all information of \(x_t\) and the predicted spatial concept \(\hat{c}_t\), and the oracle has additional access to the true concept \(c_t\). Based on the design of the spatial concept bottleneck, the intervener provides exocentric entities \(\tilde{a}^k_t\), while the robot's own ego entities are unchanged. We are thus able to re-generate the entire concept on intervention without changing all the exocentric entities.
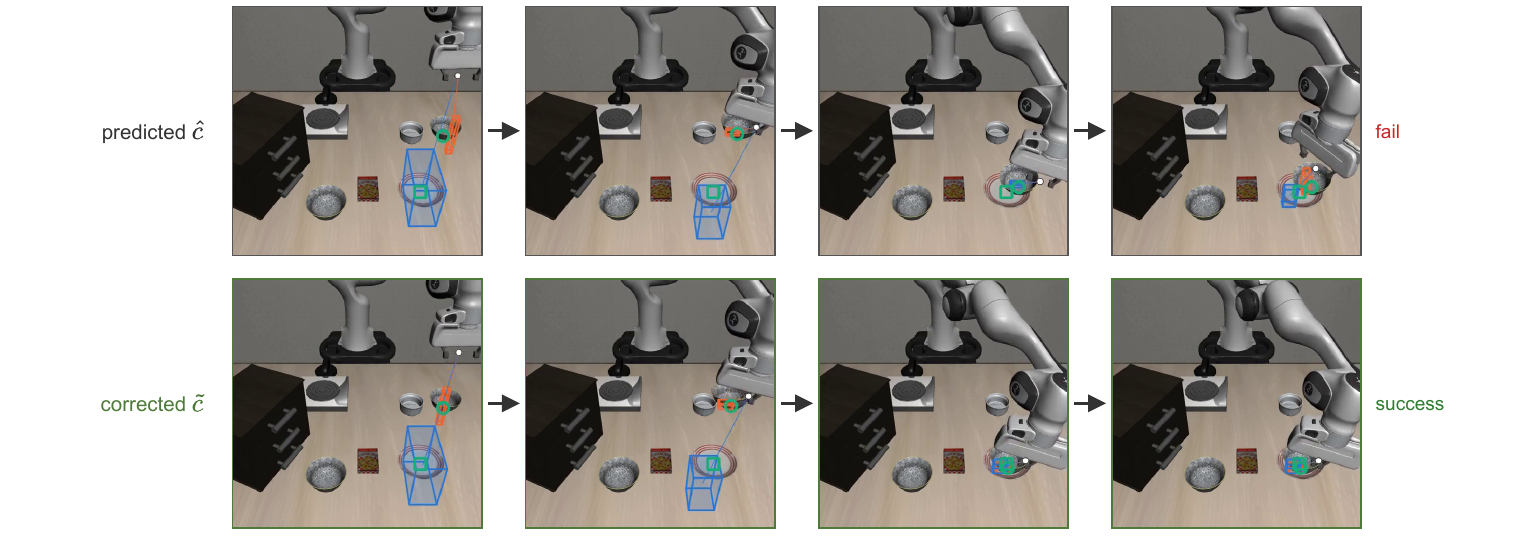
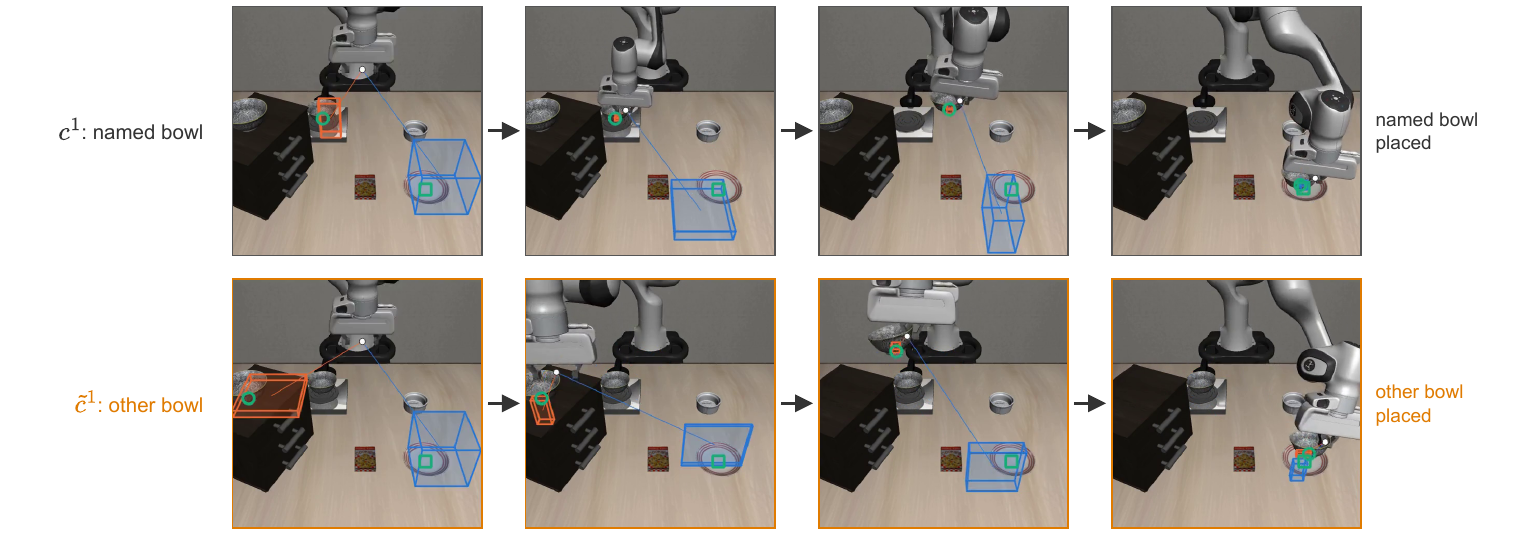
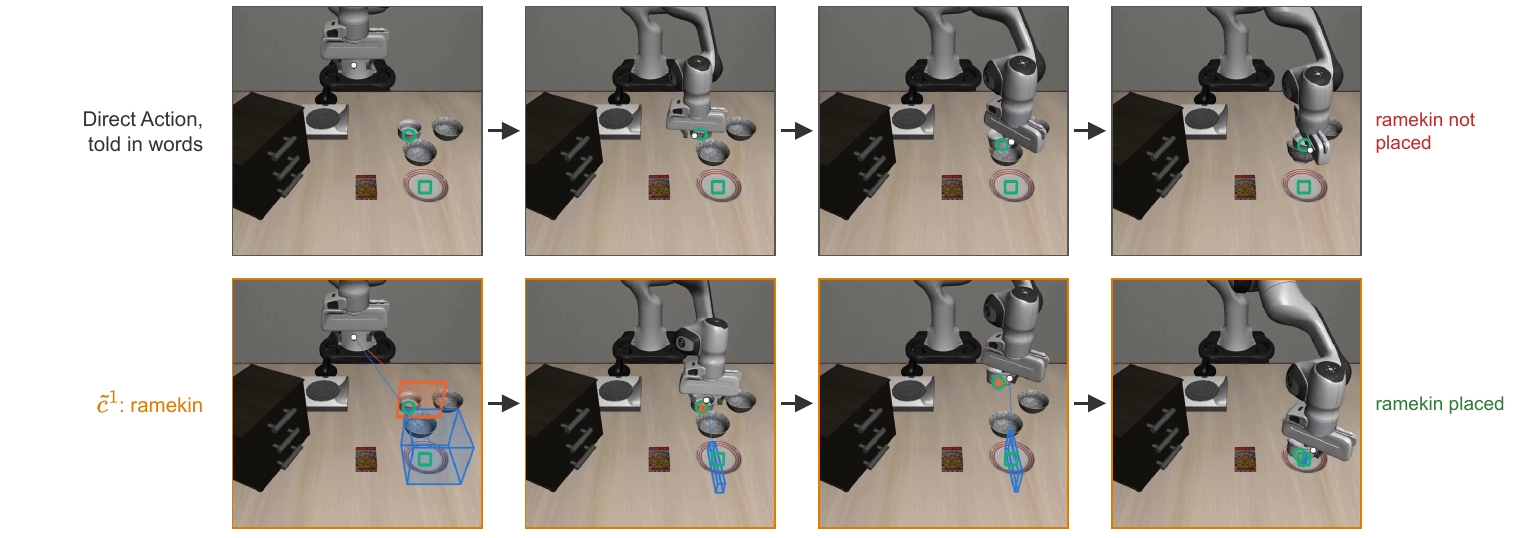
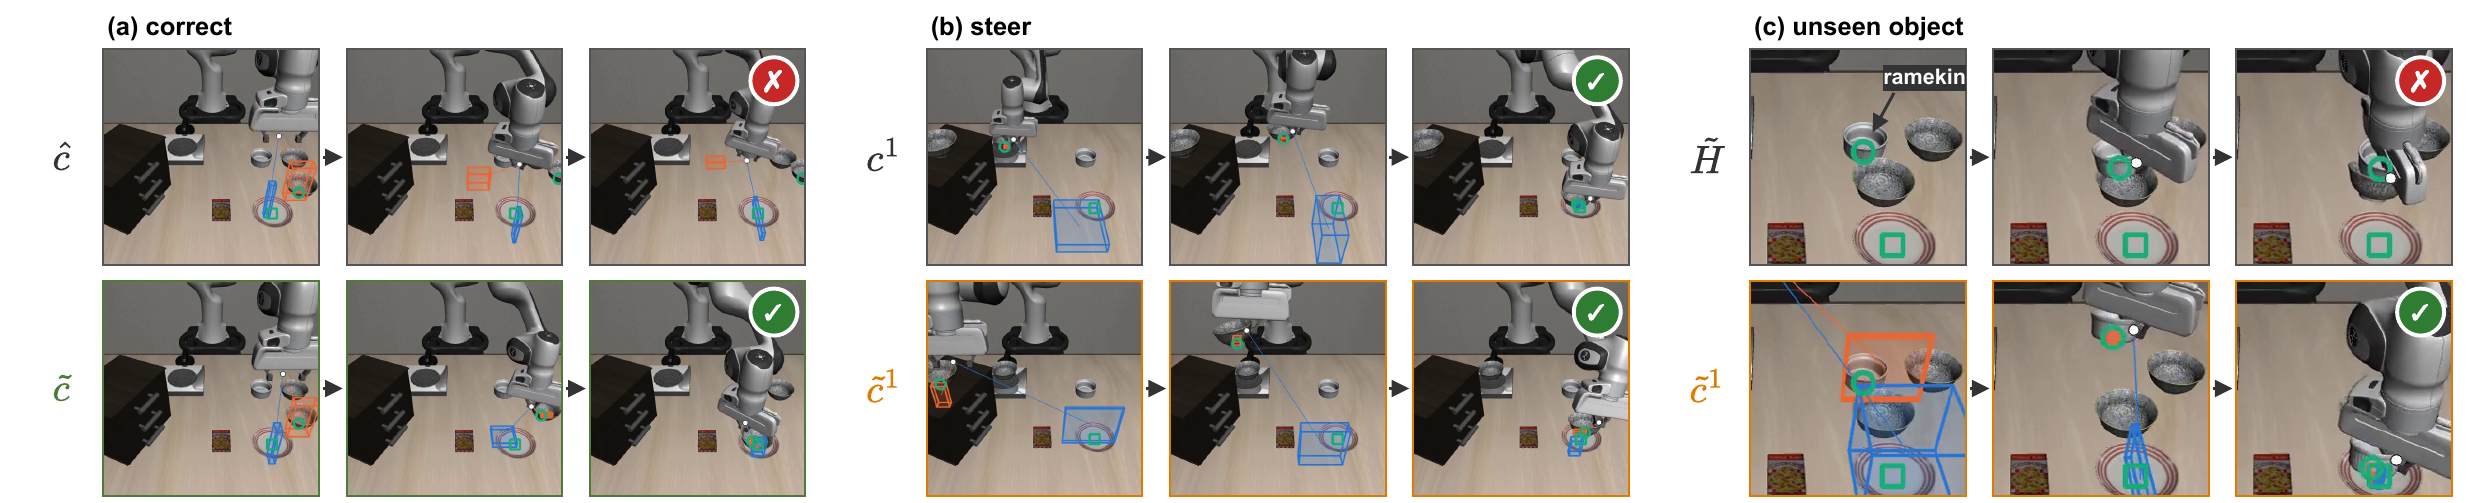
\[ \tilde{c}^k_t = \psi\big(\tilde{a}^k_t, r\big), \qquad \tilde{y}_t = f(\tilde{c}_t, \rho_t) \]In manipulation, the intervener provides the source or destination point \(\tilde{a}^k_t\), and the concept is regenerated. We use the oracle as the intervener and test three uses of the same operation. For correction, the oracle provides the true source and destination points at every step. For steering, we train the action expert with a single sentence shared across all ten tasks in place of the instruction, so that the concept is the only input that tells the robot which bowl to pick, and the oracle provides the position of the other, identical bowl as the source. For an unseen object, the oracle provides the position of the ramekin, which is never moved in any demonstration, and we compare against Direct Action whose instruction asks for the ramekin.
(a) Correction: the robot fails with the predicted concept \(\hat c\) and succeeds with the corrected \(\tilde c\).
(b) Steering: the intervener provides the other, identical bowl as the source \(\tilde a^1_t\), and the robot places that bowl instead.
(c) Unseen object: Direct Action does not place the ramekin when its instruction \(\tilde H\) asks for it, whereas providing the ramekin as the source \(\tilde a^1_t\) makes the robot place it.
We split the spatial concept bottleneck of navigation, the costmap, into three sectors: left, center, and right, which map the three most common commands an intervener would likely give. The VLM is provided the last six camera frames taken five steps apart, eight frames from the earlier traversal, the current view, the sub-goal-containing view, and the final destination image. Most importantly, the VLM is provided only the predicted costmap \(\hat{c}_t\) (and never the true costmap \(c_t\)) to propose an intervention. It is required to output “none” if no change is required, or the proposed sector along with a brief reasoning. We use the oracle to detect differences between the predicted and true costmaps and trigger the intervention.
Each video shows one episode without (left) and with (right) intervention: the RGB view and the costmap (blue is low cost, white square: least-cost cell).
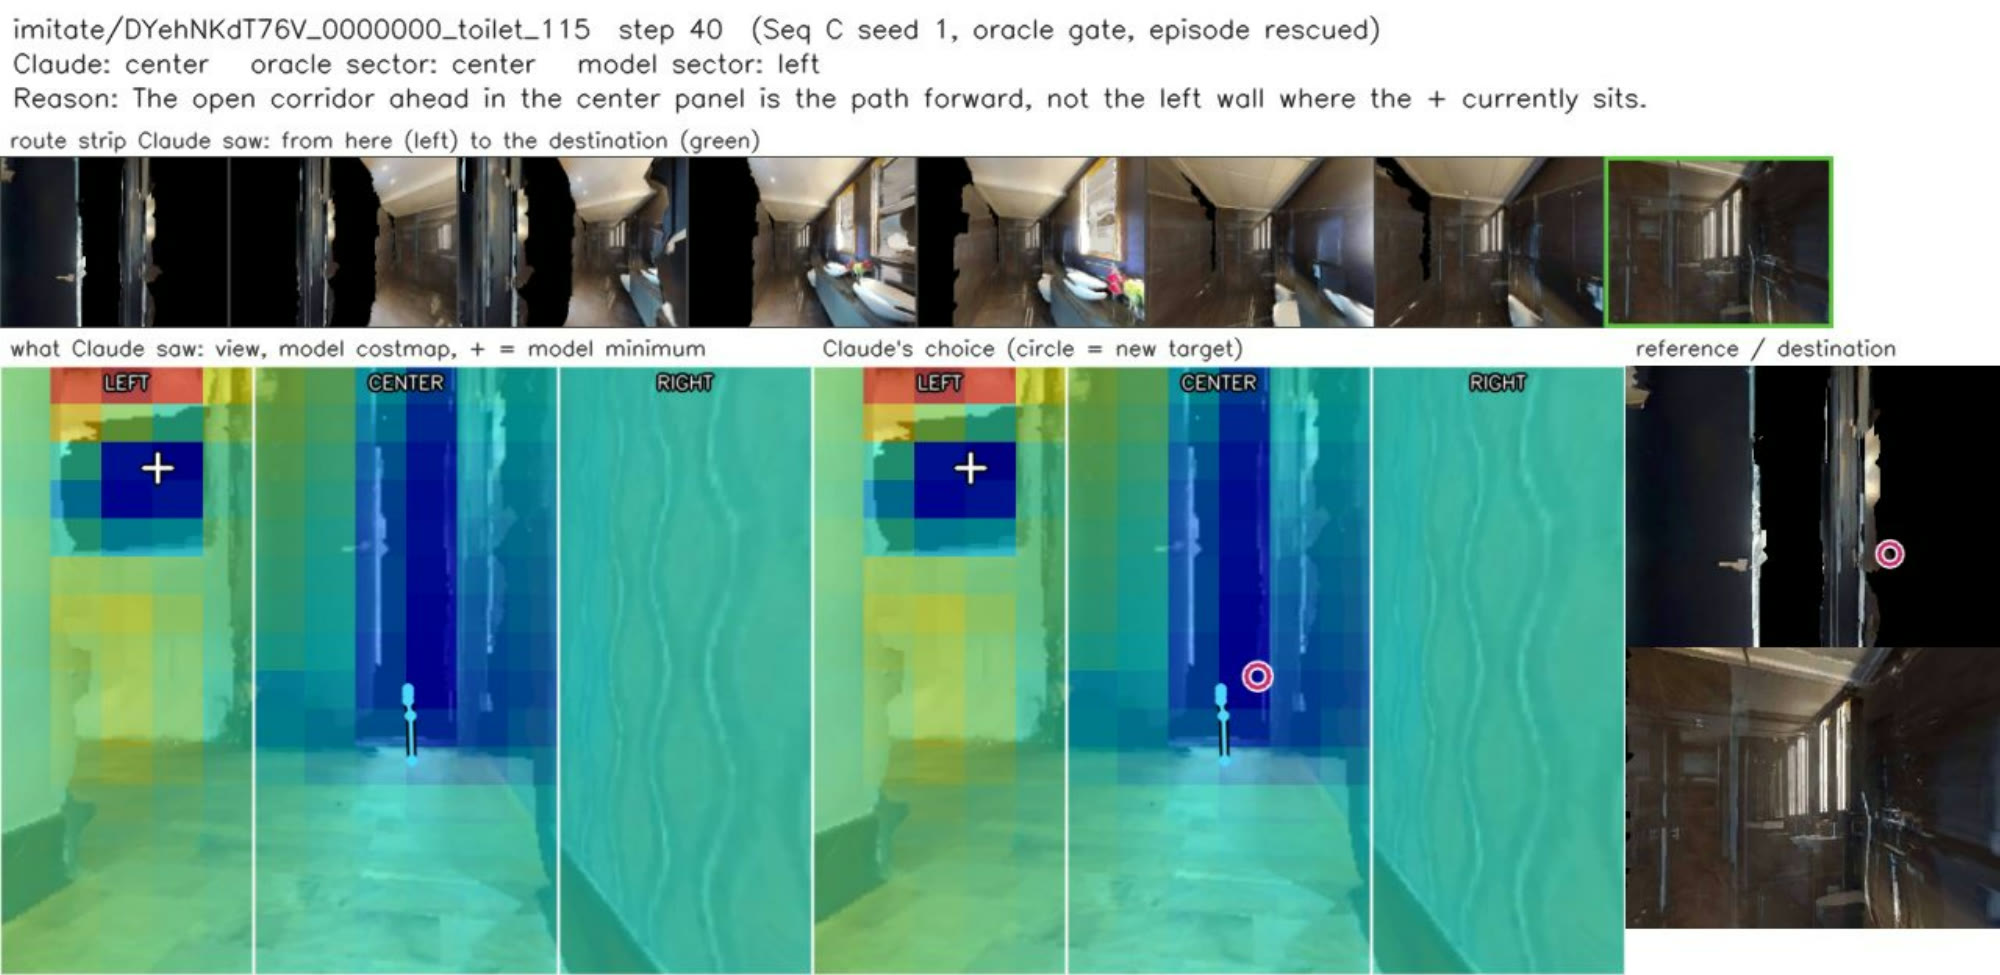
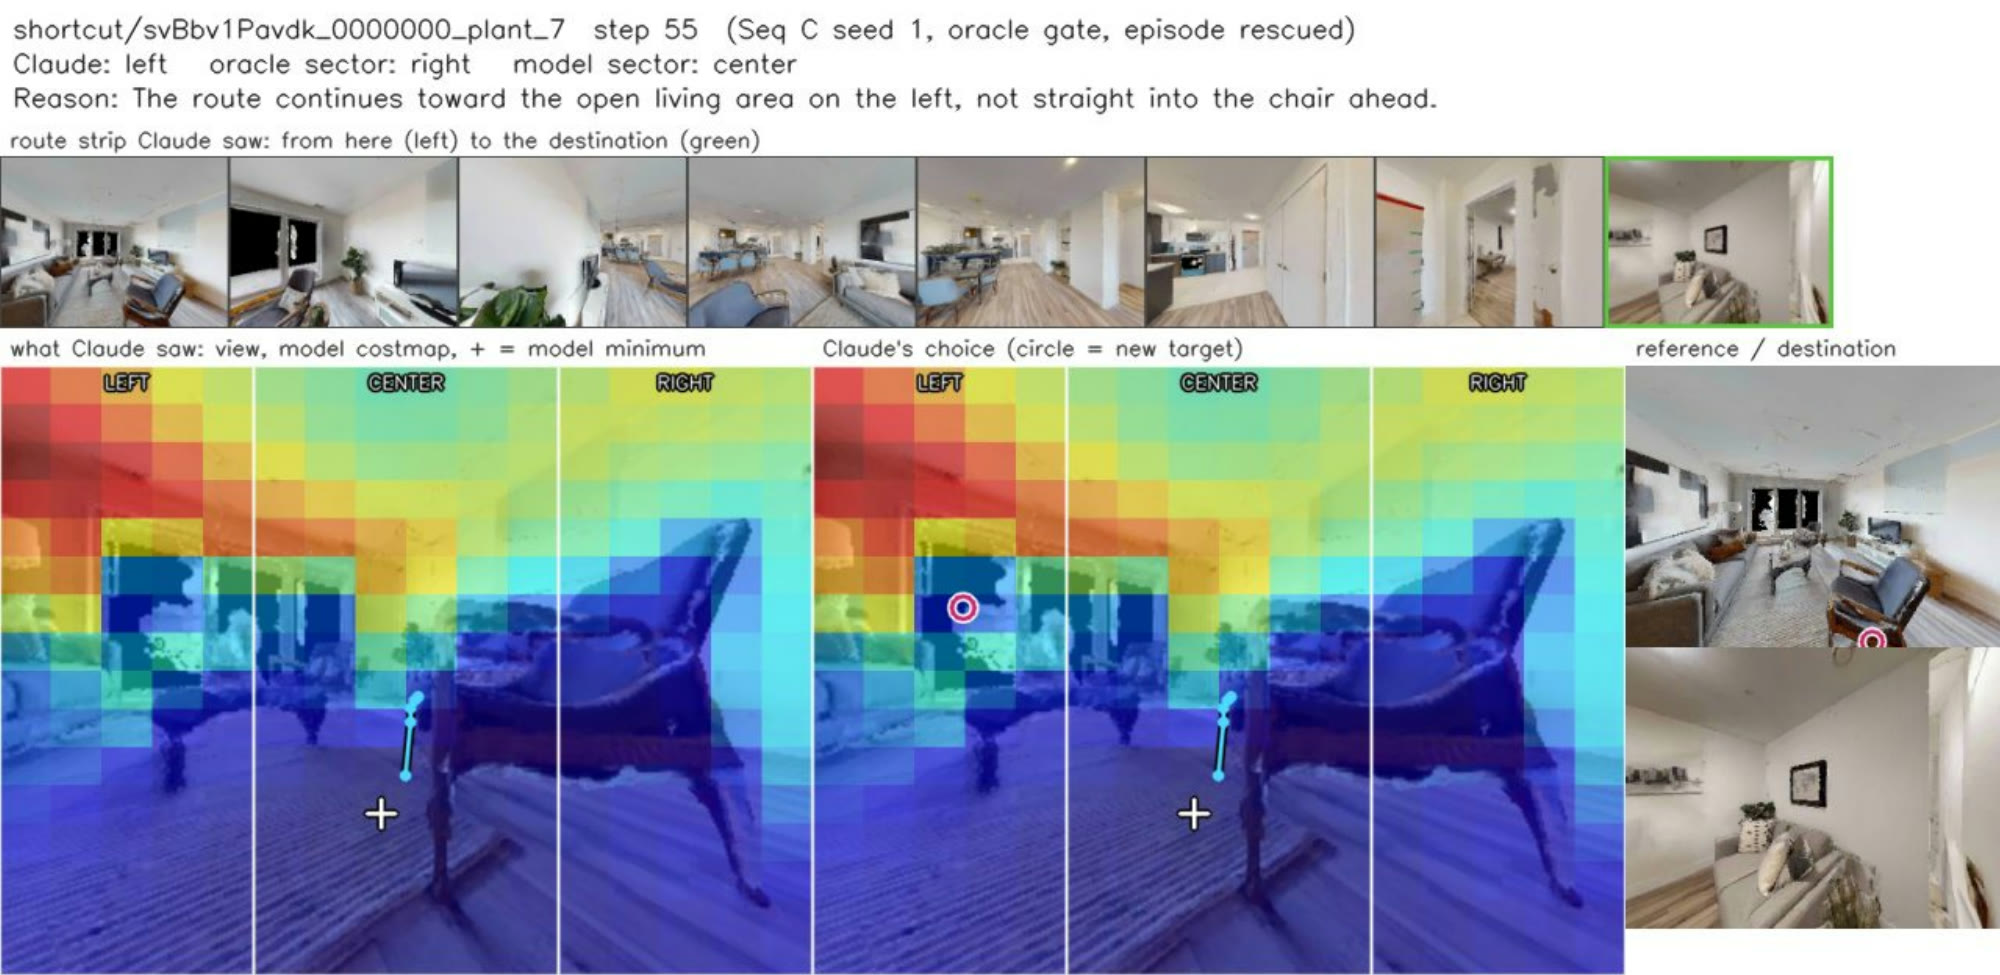
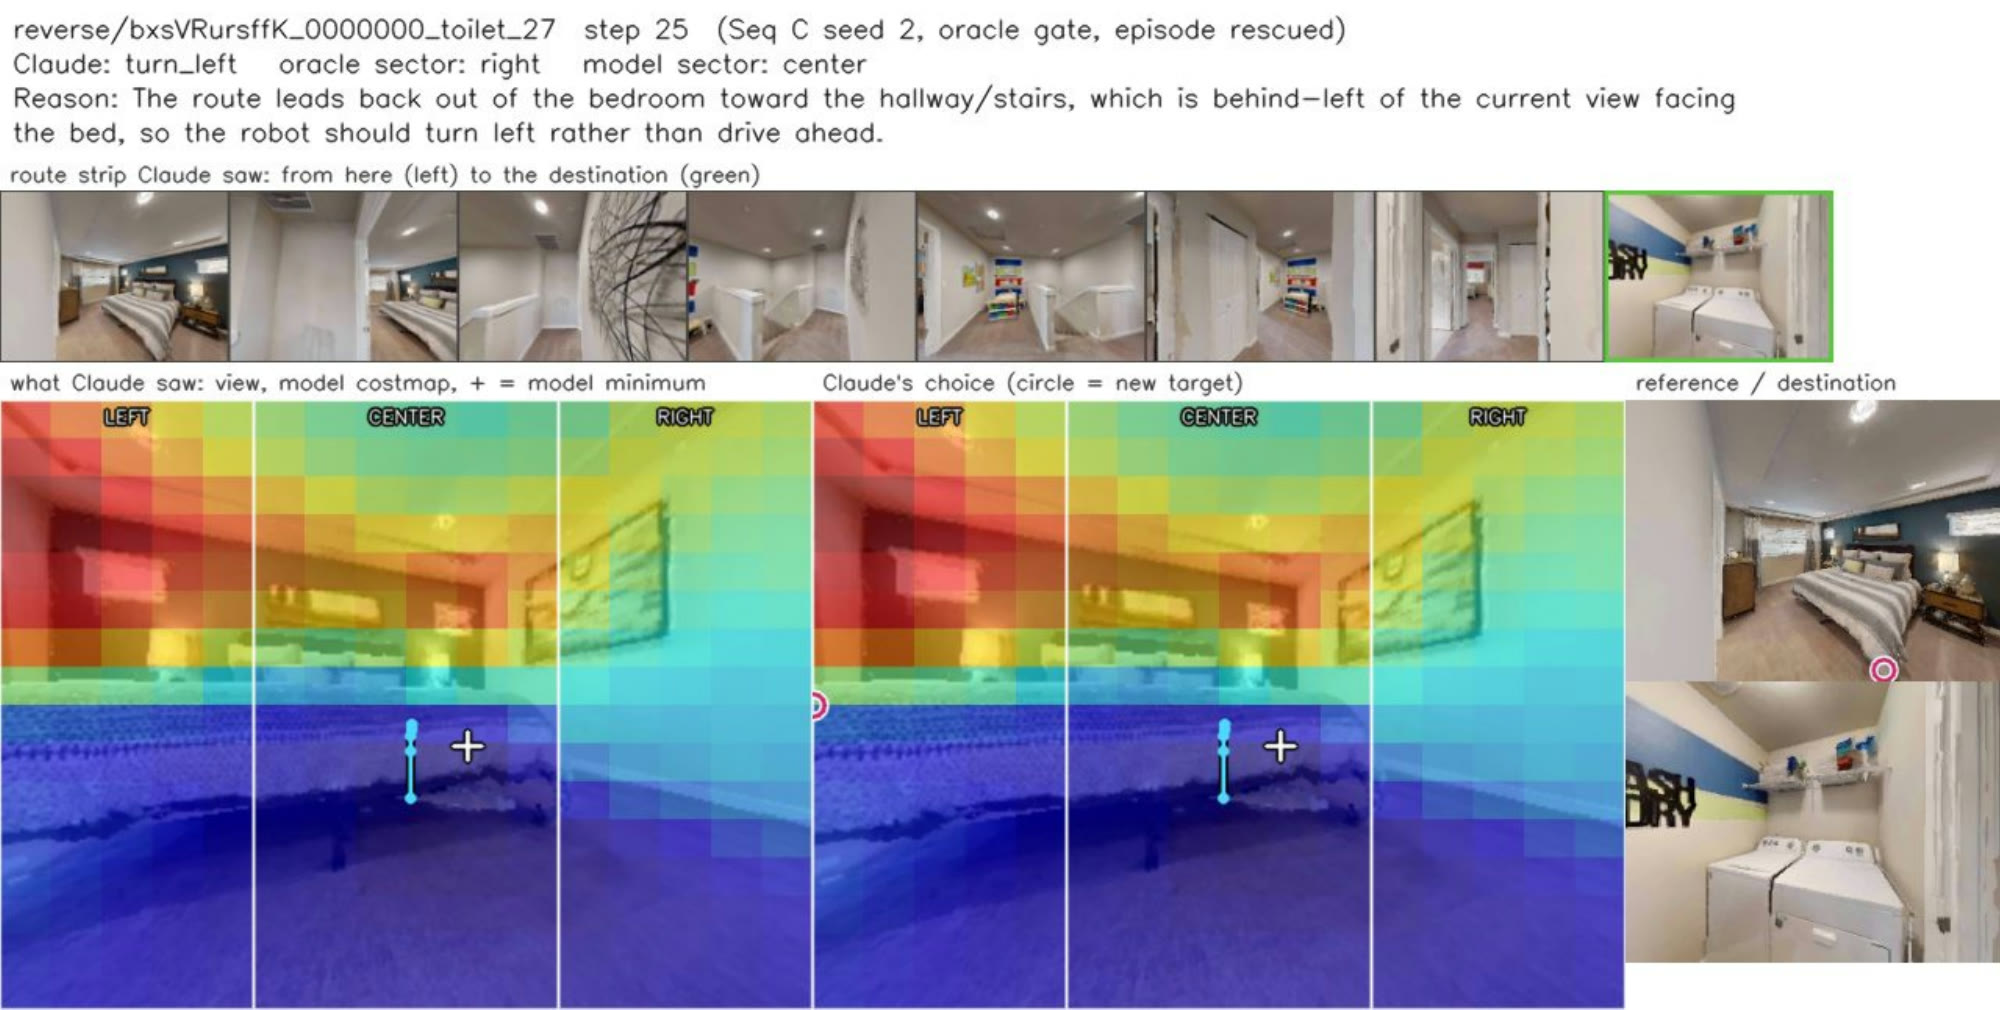
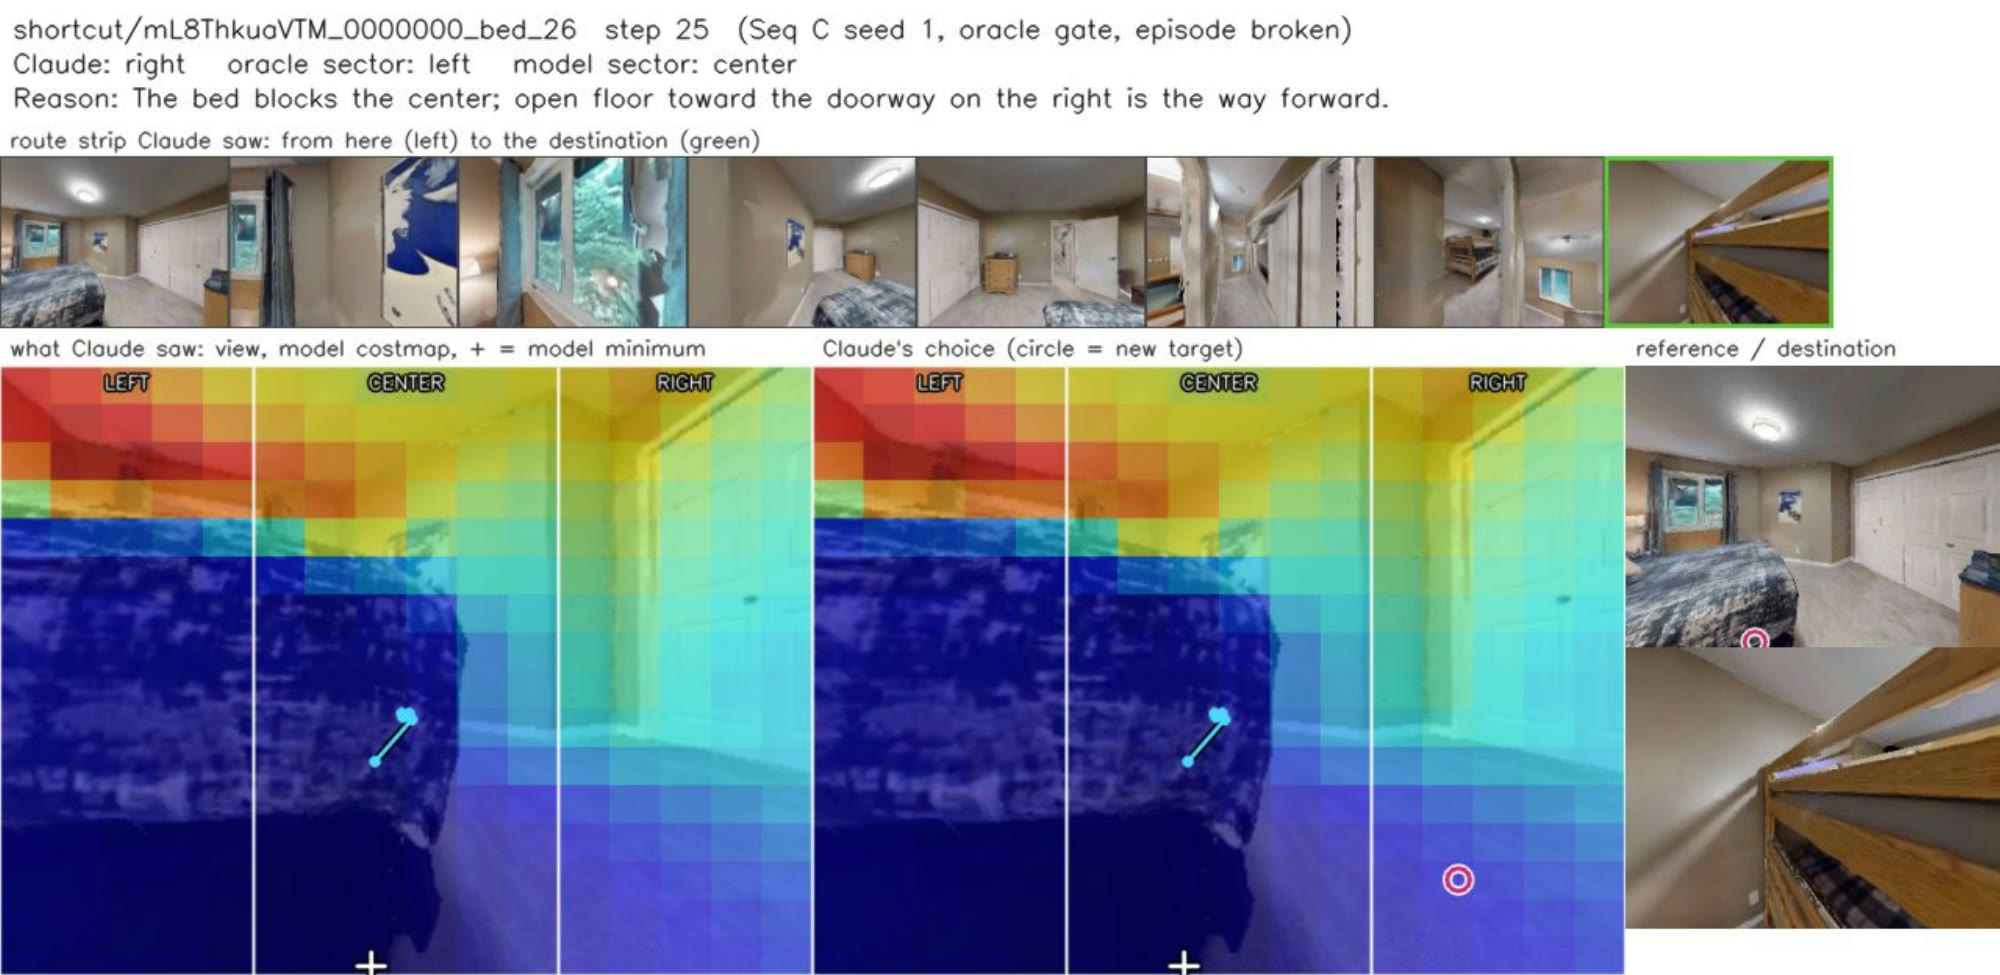
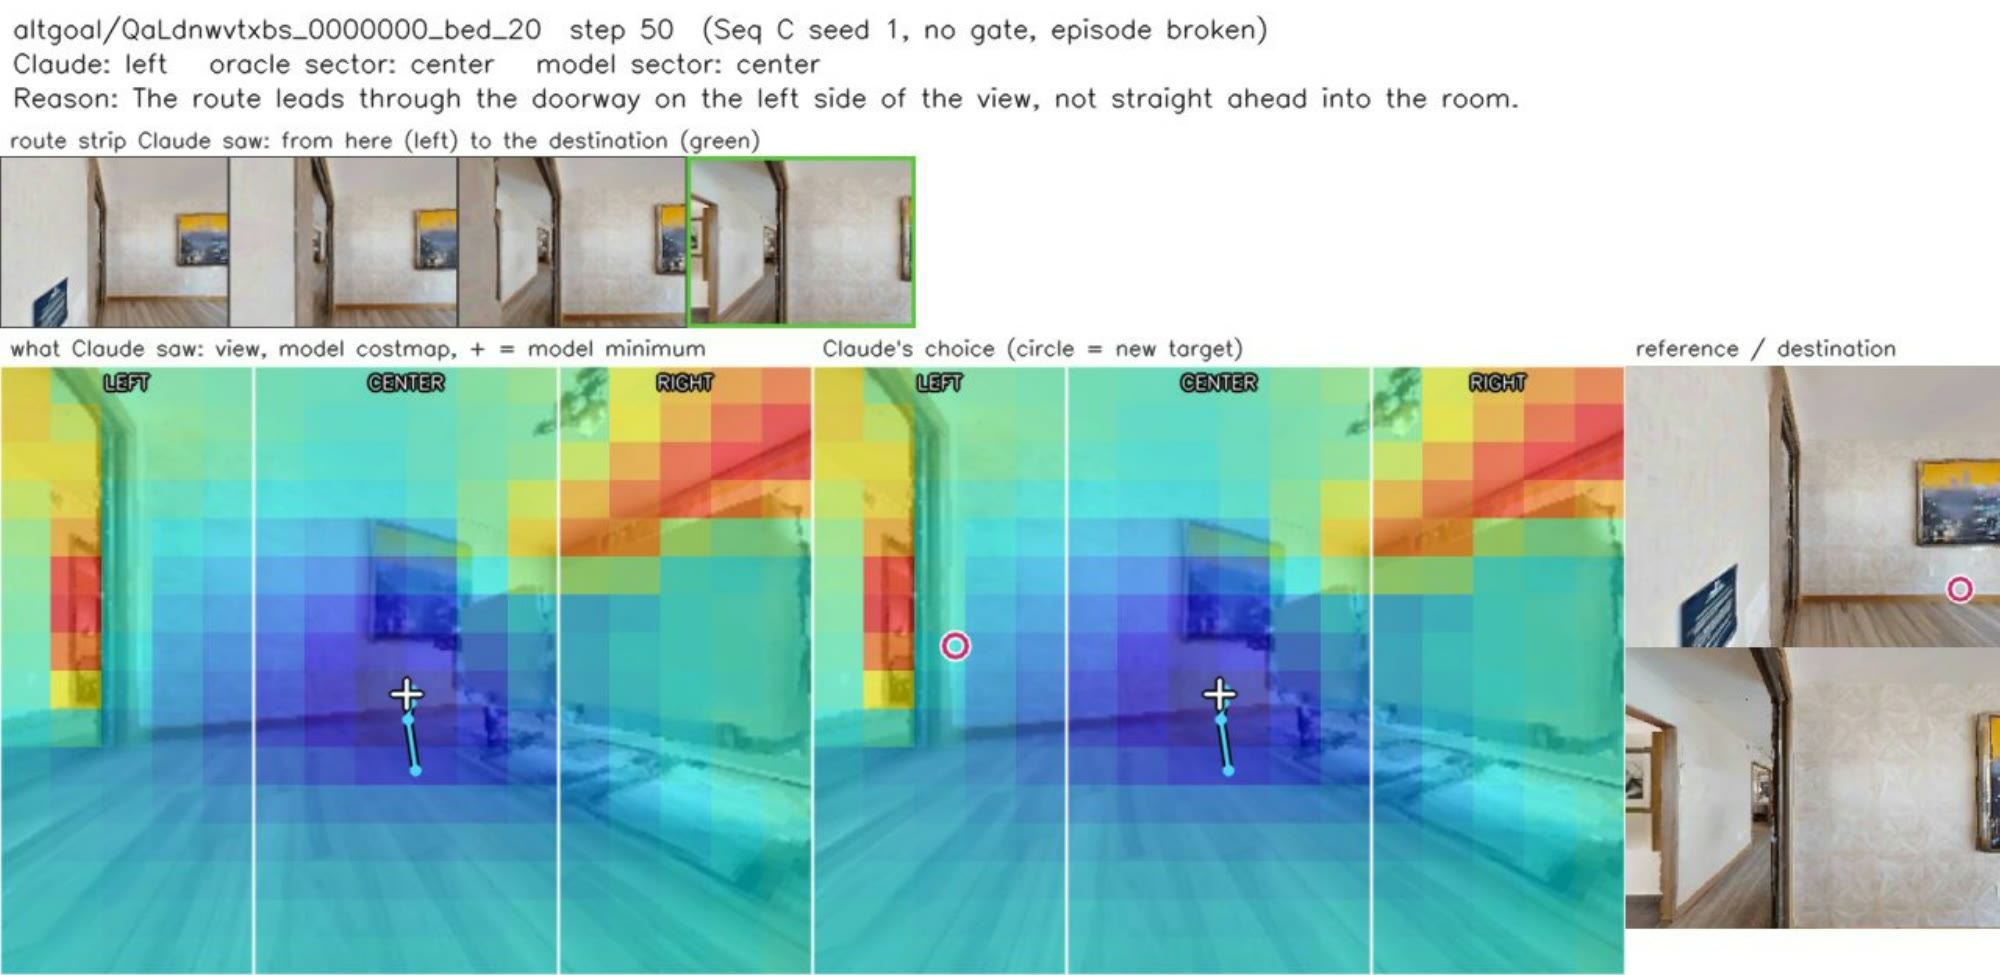
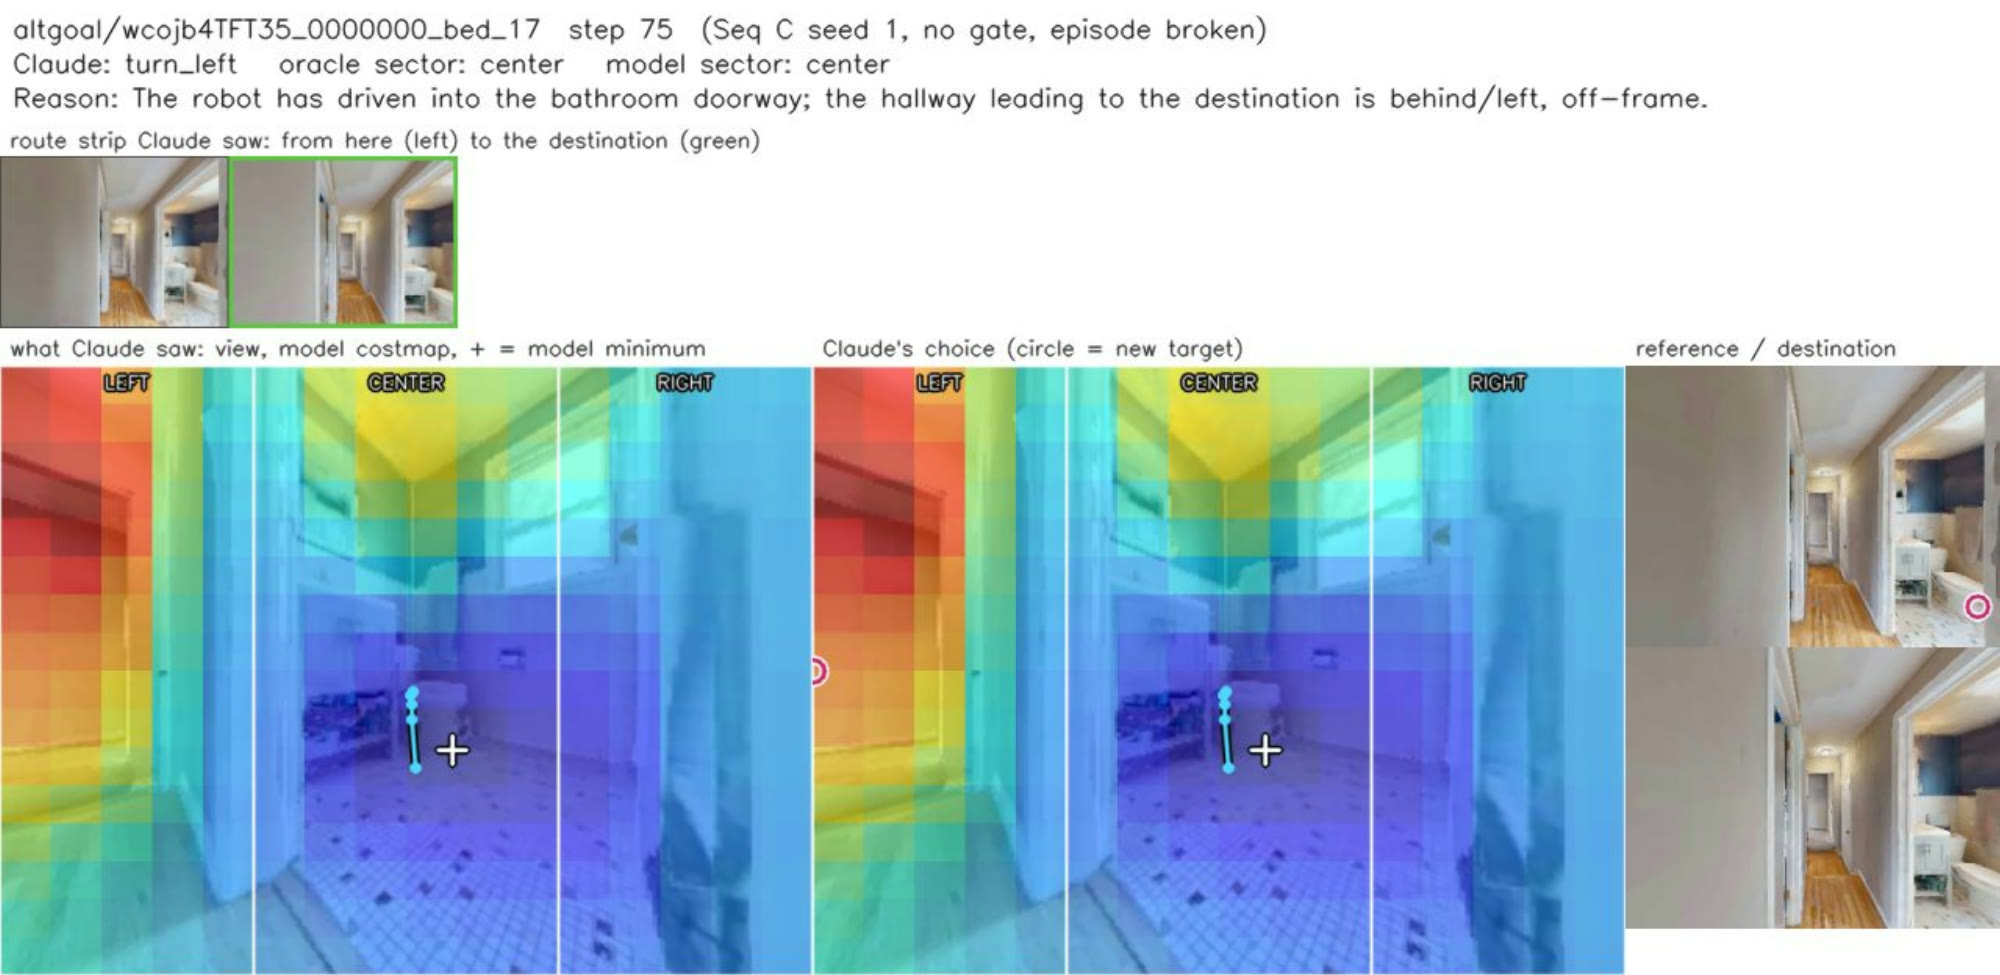
Each panel shows one decision of the VLM. The top lines give the task and step, the VLM's chosen sector next to the oracle's and the predicted costmap's sectors, and the VLM's stated reason. The strip below shows the walkthrough frames the VLM was given, from the robot's position to the destination (green border). The left block is what the VLM saw, the current view with the predicted costmap over it, where the cross marks the costmap's lowest-cost cell. The middle block is the VLM's choice, where the circle marks the new target. The right column shows the reference and destination frames.
Imitate: the VLM moves the target off a wall onto the open corridor, the same sector the oracle would choose.
Shortcut: the VLM moves the target off the furniture toward the open living area, a different sector from the oracle's, and the robot reaches the goal.
Reverse: the VLM recognizes that the way out of the bedroom is behind and to the left.
The VLM's stated reason shows why. In Alt-goal the goal is not at the end of the recorded route, so relying on the route frames over the destination image misleads the VLM.
Shortcut: “The bed blocks the center, open floor toward the doorway on the right is the way forward.” The VLM follows the doorway seen in the route frames, while the shorter path to the goal goes left.
Alt-goal: the predicted costmap was already correct, and the VLM follows the route frames toward a doorway on the left, although the goal lies ahead.
Alt-goal: “The robot has driven into the bathroom doorway.” The VLM follows the route frames back toward the hallway, although the goal lies ahead.
Each figure shows two runs from the same start: the top row without the intervention and the bottom row with it. Orange and blue boxes show where the concept places the source and the destination, and green marks the true positions.